Disable Legacy Authenication
What is Legacy Authenication
Azure AD supports several of the most widely used authentication and authorization protocols including legacy authentication. Legacy authentication refers to basic authentication, a widely used industry-standard method for collecting user name and password information. Typically, legacy authentication clients can’t enforce any type of second factor authentication. Examples of applications that commonly or only use legacy authentication are:
- Microsoft Office 2013 or older.
- Apps using mail protocols like POP, IMAP, and SMTP AUTH.
Single factor authentication (for example, username and password) isn’t enough these days. Passwords are bad as they’re easy to guess and we (humans) are bad at choosing good passwords. Passwords are also vulnerable to various attacks, like phishing and password spray. One of the easiest things you can do to protect against password threats is to implement multifactor authentication (MFA). With MFA, even if an attacker gets in possession of a user’s password, the password alone isn’t sufficient to successfully authenticate and access the data.
How can you prevent apps using legacy authentication from accessing your tenant’s resources? The recommendation is to just block them with a Conditional Access policy. If necessary, you allow only certain users and specific network locations to use apps that are based on legacy authentication.
Conditional Access policies are enforced after the first-factor authentication has been completed. Therefore, Conditional Access isn’t intended as a first line defense for scenarios like denial-of-service (DoS) attacks, but can utilize signals from these events (for example, the sign-in risk level, location of the request, and so on) to determine access.
For MFA to be effective, you also need to block legacy authentication. This is because legacy authentication protocols like POP, SMTP, IMAP, and MAPI can’t enforce MFA, making them preferred entry points for adversaries attacking your organization. In September 2019, Exchange Online announced the deprecation of legacy authentication. Beginning in early 2021, Microsoft started to disable Basic authentication for existing tenants with no reported usage. Microsoft always provide Message Center notifications to any customer prior to Basic authentication being disabled in their tenant.
In September 2021, Microsoft announced that effective October 1, 2022, Microsoft will begin disabling Basic authentication for Outlook, EWS, RPS, POP, IMAP, and EAS protocols in Exchange Online. SMTP Auth will also be disabled if it is not being used. See full announcement: Basic Authentication and Exchange Online – September 2021 Update.
The numbers on legacy authentication from an analysis of Azure Active Directory (Azure AD) traffic are stark:
- More than 99 percent of password spray attacks use legacy authentication protocols
- More than 97 percent of credential stuffing attacks use legacy authentication
- Azure AD accounts in organizations that have disabled legacy authentication experience 67 percent fewer compromises than those where legacy authentication is enabled
Review Legacy Authenication Report
Before you can block legacy authentication in your directory, you need to first understand if your users have apps that use legacy authentication and how it affects your overall directory. Azure AD sign-in logs can be used to understand if you’re using legacy authentication.
- Navigate to the Azure portal > Azure Active Directory > Sign-ins.
- Add the Client App column if it is not shown by clicking on Columns > Client App.
- Filter by Client App > check all the Legacy Authentication Clients options presented.
- Filter by Status > Success.
- Expand your date range if necessary using the Date filter.
- If you have activated the new sign-in activity reports preview, repeat the above steps also on the User sign-ins (non-interactive) tab.
Filtering will only show you successful sign-in attempts that were made by the selected legacy authentication protocols. Clicking on each individual sign-in attempt will show you additional details. The Client App column or the Client App field under the Basic Info tab after selecting an individual row of data will indicate which legacy authentication protocol was used. These logs will indicate which users are still depending on legacy authentication and which applications are using legacy protocols to make authentication requests. For users that do not appear in these logs and are confirmed to not be using legacy authentication, implement a Conditional Access policy or enable the Baseline policy: block legacy authentication for these users only.
The following messaging protocols are legacy authentication:
- Authenticated SMTP - Used to send authenticated email messages.
- Autodiscover - Used by Outlook and EAS clients to find and connect to mailboxes in Exchange Online.
- Exchange ActiveSync (EAS) - Used to connect to mailboxes in Exchange Online.
- Exchange Online PowerShell - Used to connect to Exchange Online with remote PowerShell. If you block Basic authentication for Exchange Online PowerShell, you need to use the Exchange Online PowerShell Module to connect. For instructions, see Connect to Exchange Online PowerShell using multifactor authentication.
- Exchange Web Services (EWS) - A programming interface that’s used by Outlook, Outlook for Mac, and third-party apps.
- IMAP4 - Used by IMAP email clients.
- MAPI over HTTP (MAPI/HTTP) - Primary mailbox access protocol used by Outlook 2010 SP2 and later.
- Offline Address Book (OAB) - A copy of address list collections that are downloaded and used by Outlook.
- Outlook Anywhere (RPC over HTTP) - Legacy mailbox access protocol supported by all current Outlook versions.
- POP3 - Used by POP email clients.
- Reporting Web Services - Used to retrieve report data in Exchange Online.
- Universal Outlook - Used by the Mail and Calendar app for Windows 10.
- Other clients - Other protocols identified as utilizing legacy authentication. For more information about these authentication protocols and services.
Security Default
Microsoft released Security defaults in January 2020 in effort to raise the security standard for all it’s customers by allowing MFA for all users and disabling legacy authenication. You may have this feature already enabled as Microsoft slowly change this setting for all tenants. However it’s a good idea to ensure your current security posture.
If you have Azure AD Premium you may want to look at leveraging Condtional access instead to have more customization. Security Defaults is provided for free for any customer however, lacks any customization. Azure AD Premium licenses are aviable in stand alone P1 and P2 which are also included in M365 Business Premium and higher bundles, and Enterprise Mobilitiy + Security E3 /E5.
If you have an existing tenant where you’d like to enable security defaults, or are ready to turn it off and move up to using Conditional Access to manage your access policies, you’ll find the settings in your Azure AD tenant configuration in Azure Active Directory, Manage, Properties – look for “Manage Security Defaults” at the bottom of the page:
Navigate to your Azure Active Directory or Azure Portal and go to Properties. Scroll to the bottom and click on Manage Security Defaults.
You’ll see the blade that allows you to enable security defaults. But again, security and identity enthusiast – you probably want the advanced controls that Azure Active Directory Conditional Access gives you.
You can’t enable Security Defaults if you’re already using conditional access policies or other settings which conflict. If you do, you’ll see this warning:
Disable Per User MFA
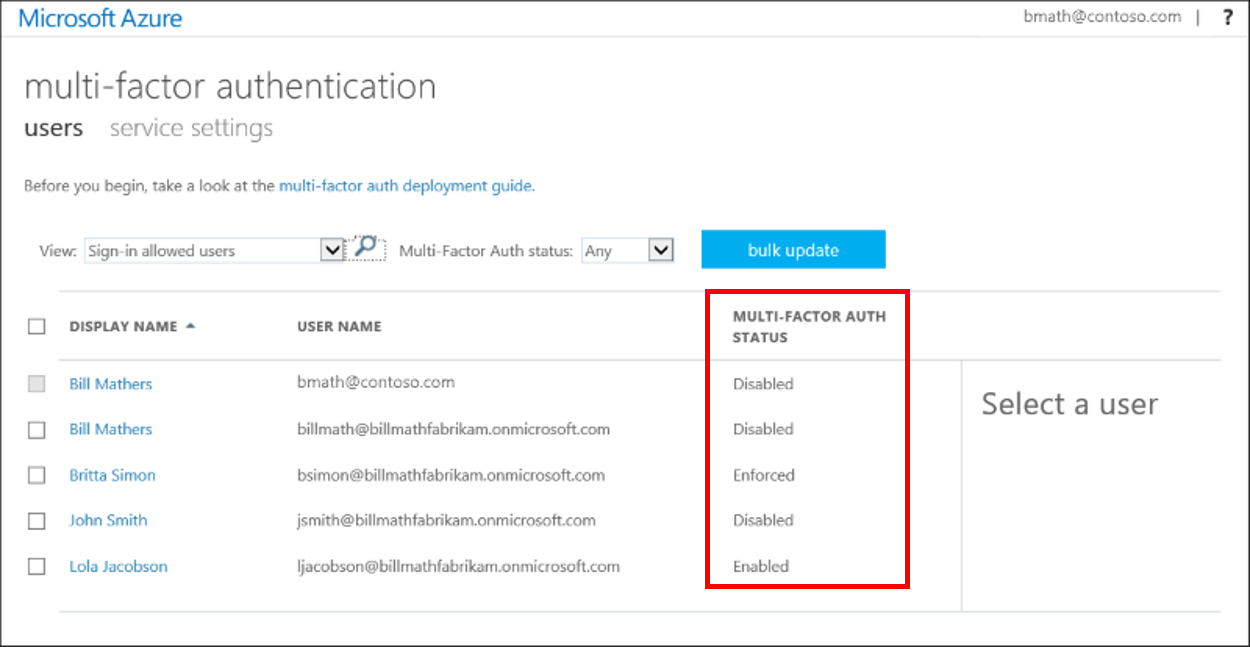
If your organization is a previous user of per-user based Azure AD Multi-Factor Authentication, don’t be alarmed to not see users in an Enabled or Enforced status if you look at the Multi-Factor Auth status page. Disabled is the appropriate status for users who are using security defaults or Conditional Access based Azure AD Multi-Factor Authentication.
View the status for a user
To view and manage user states, complete the following steps to access the Azure portal page:
- Sign in to the Azure portal as a Global administrator.
- Search for and select Azure Active Directory, then select Users > All users.
- Select Per-user MFA. You may need to scroll to the right to see this menu option. Select the example screenshot below to see the full Azure portal window and menu location: Select Multi-Factor Authentication from the Users window in Azure AD.

- A new page opens that displays the user state, as shown in the following example. Screenshot that shows example user state information for Azure AD Multi-Factor Authentication. Let’s go change everyone to Disabled as Security Defaults or Condtional Access should dictate the actions going forward.

Combined User Registration
Before combined registration, users registered authentication methods for Azure AD Multi-Factor Authentication and self-service password reset (SSPR) separately. People were confused that similar methods were used for Azure AD Multi-Factor Authentication and SSPR but they had to register for both features. Now, with combined registration, users can register once and get the benefits of both Azure AD Multi-Factor Authentication and SSPR.
Enable Combined Security registration
- Sign in to the Azure portal as a user administrator or global administrator.
- Go to Azure Active Directory > User settings > Manage user feature settings.
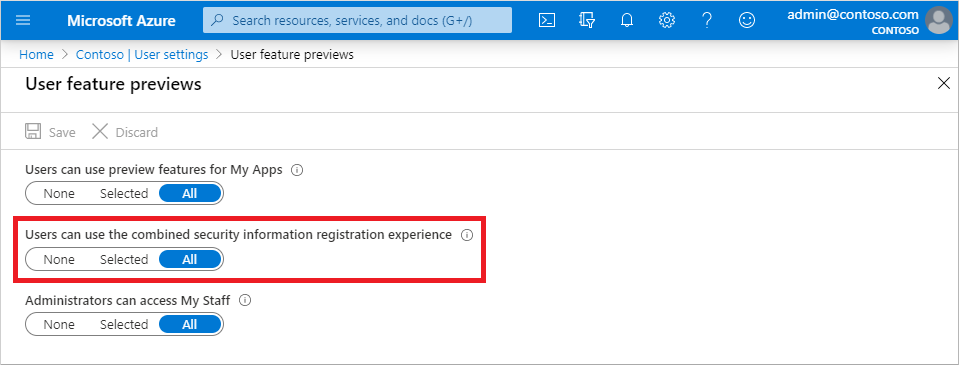
- Under Users can use the combined security information registration experience, choose to enable for a Selected group of users or for All users.

Condtional Access
Security defaults are great for some but many organizations need more flexibility than they offer. Many organizations need to exclude specific accounts like their emergency access or break-glass administration accounts from Conditional Access policies. The policies referenced in this article can be customized based on organizational needs. Organizations can use report-only mode for Conditional Access to determine the results of new policy decisions.
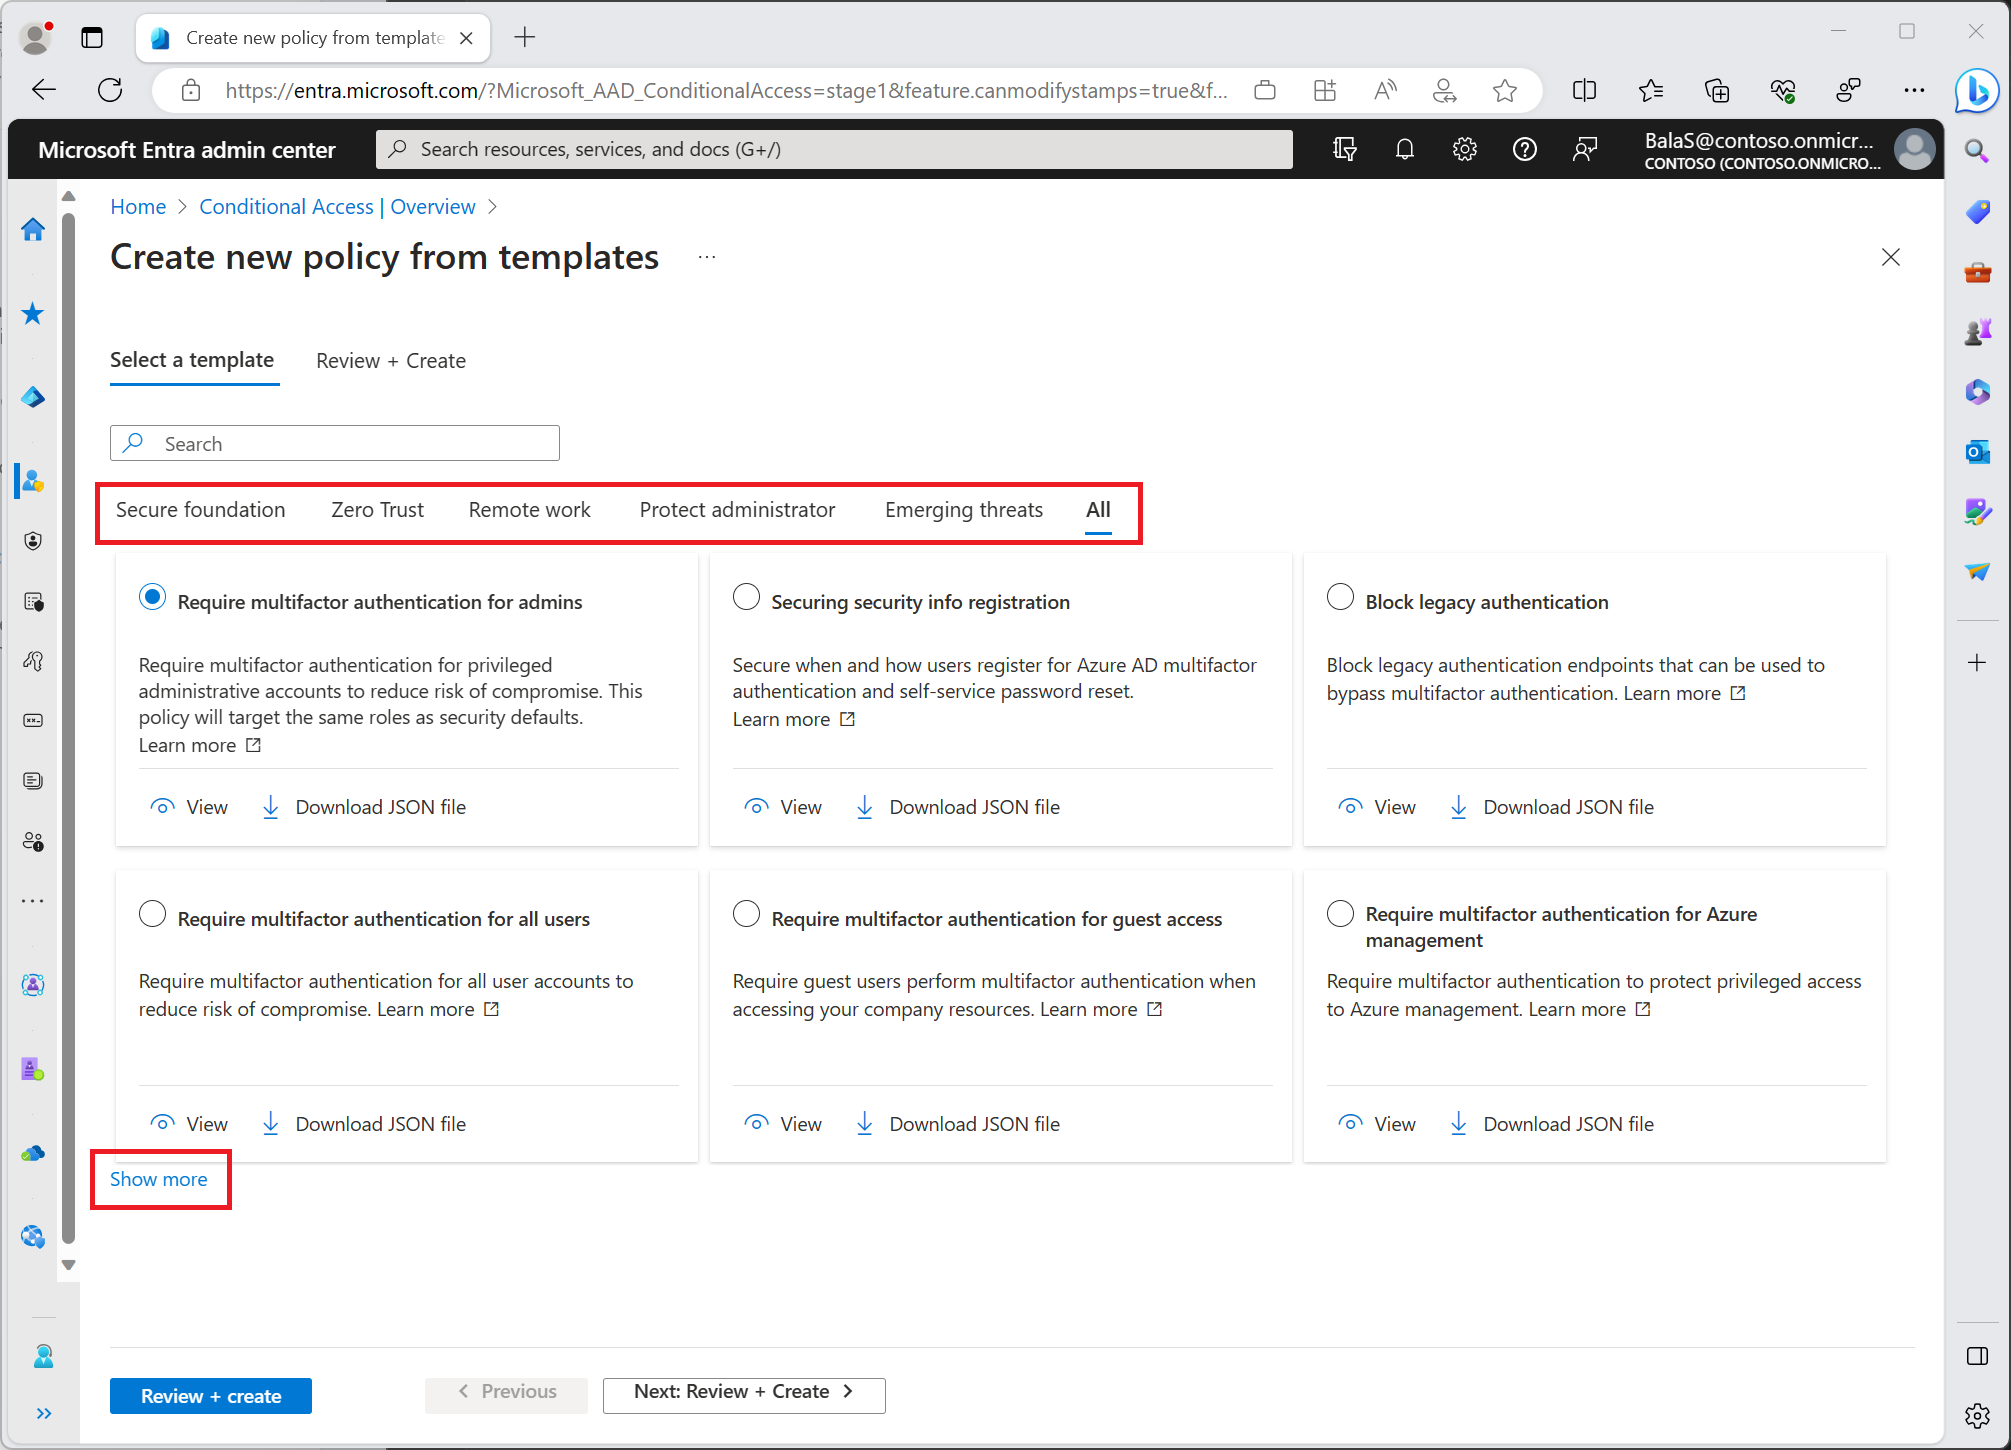
Microsoft has provided Conditional Access templates which are designed to provide a convenient method to deploy new policies aligned with Microsoft recommendations. These templates are designed to provide maximum protection aligned with commonly used policies across various customer types and locations.
There is currently 14 policy templates split into policies that would be assigned to user identities or devices. Find the templates in the Azure portal > Azure Active Directory > Security > Conditional Access > Create new policy from template.
Now to provide similar protection Security Default provides we’ll want to create and apply these policies.
- Require multi factor authenication for admins
- Require multi factor for all users
- Block legacy authenication

MFA Registration Policy
Azure AD Identity Protection helps you manage the roll-out of Azure AD Multi-Factor Authentication (MFA) registration by configuring a Conditional Access policy to require MFA registration no matter what modern authentication app you are signing in to.
MFA Registration Policy Configuration
- Navigate to the Azure Portal.
- Browse to Azure Active Directory > Security > Identity Protection > MFA registration policy.
- Under Assignments
- Users - Choose All users or Select individuals and groups if limiting your rollout.
- Optionally you can choose to exclude users from the policy.
- Enforce Policy - On
- Save
Disable App Password Creation
App Passwords is an older method that was provied to allow legacy application to stasify multi-factor authenication when they didn’t support OUATH / Modern Authenication. Since App Password is just a fancy password that is still single factor we’ll want to ensure this is disabled in your envrioment for best security.
- Sign in to Azure Active Directory, then choose Users.
- Select Multi-Factor Authentication from the navigation bar across the top of the Users window.
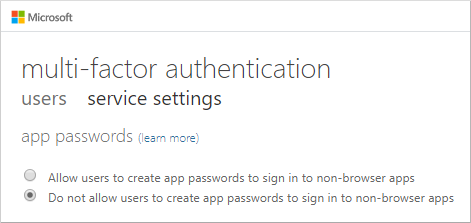
- Under Multi-Factor Authentication, select service settings.
- On the Service Settings page, select the Do not allow users to create app passwords to sign in to non-browser apps option.
- Scroll down and click Save at the bottom.

Disable Legacy Protocols
Legacy protocols are still enabled on various services and despite having Security Defaults or Condtional Access blocking these authenications, its still possible to access the various severice with legacy protocols that don’t support Multi-factor authenication. To address this we can go ahead and disable the protocols in these services to further harden your enviroment.
Disable Sharepoint Legacy Authentication
This requires the Sharepoint Online powershell module to be installed in order to complete.
First you can check if you have already installed the SharePoint Online Management Shell by running the following command in administrative mode in PowerShell:
Get-Module -Name Microsoft.Online.SharePoint.PowerShell -ListAvailable | Select Name,Version
If you have the module installed let’s make sure you’re running the latest
Update-Module -Name Microsoft.Online.SharePoint.PowerShell
If your operating system is using PowerShell 5 or newer, you can also install the SharePoint Online Management Shell by running the following command in administrative mode:
Install-Module -Name Microsoft.Online.SharePoint.PowerShell
Now let’s go ahead and get your legacy authenication disabled on Sharepoint. If you don’t know your admin URL you can visit the https://admin.microsoft.com and click on Sharepoint admin. Copy the URL into the next powershell after -URL I’ve provided an example syntax.
# Connect to Sharepoint online services
Connect-SPOService -Url https://<tenantName>-admin.sharepoint.com
# Disabled Legacy Authenication
Set-SPOTenant -LegacyAuthProtocolsEnabled:$False
Disable Exchange Legacy Authentication
This requires the Exchange Online v2 powershell module to be installed in order to complete.
First you can check if you have already installed the Exchange Online Management Shell by running the following command in administrative mode in PowerShell:
Get-Module -Name ExchangeOnlineManagement -ListAvailable | Select Name,Version
If you have the module installed let’s make sure you’re running the latest
Update-Module -Name ExchangeOnlineManagement
If your operating system is using PowerShell 5 or newer, you can also install the Exchange Online Management Shell by running the following command in administrative mode:
Install-Module -Name ExchangeOnlineManagement
Before we proceed let’s verify your current envrioment setup. If you see a default policy applied you’ll want to review the current policy. If you have other policies created in your organization Review these as well. If however you have an older tenant it’s likely these all returned with no results if none have been created in the past. Newer tenants may have a policy for some basic default protocols disbale however it may not disabled all of them.
# Login to EXO
Connect-ExchangeOnline
# Check for current authenication Policies
Get-AuthenticationPolicy | Format-Table Name -Auto
# Check Organization Default Policy
Get-OrganizationConfig | Select DefaultAuthenticationPolicy
This next block will go through and setup and configure the policy for you.
# Login to EXO
Connect-ExchangeOnline
# Create new Policy
New-AuthenticationPolicy -Name "Block Basic Auth"
# Setting for blocking all basic protcols
Set-AuthenticationPolicy -Identity "Block Basic Auth" -AllowBasicAuthActiveSync:$false -AllowBasicAuthAutodiscover:$false -AllowBasicAuthReportingWebServices:$false -AllowBasicAuthOutlookService:$false -AllowBasicAuthImap:$false -AllowBasicAuthMapi:$false -AllowBasicAuthOfflineAddressBook:$false -AllowBasicAuthPop:$false -AllowBasicAuthPowershell:$false -AllowBasicAuthRpc:$false -AllowBasicAuthSmtp:$false -AllowBasicAuthWebServices:$false

# Set new policy as Default Policy for new accounts
Set-OrganizationConfig -DefaultAuthenticationPolicy "Block Basic Auth"

# Update existing accounts to apply the new Policy
$users = Get-User -ResultSize unlimited -Filter <Filter>
$usersEmail = $users.MicrosoftOnlineServicesID
$usersEmail | foreach {Set-User -Identity $_ -AuthenticationPolicy "Block Basic Auth"}


